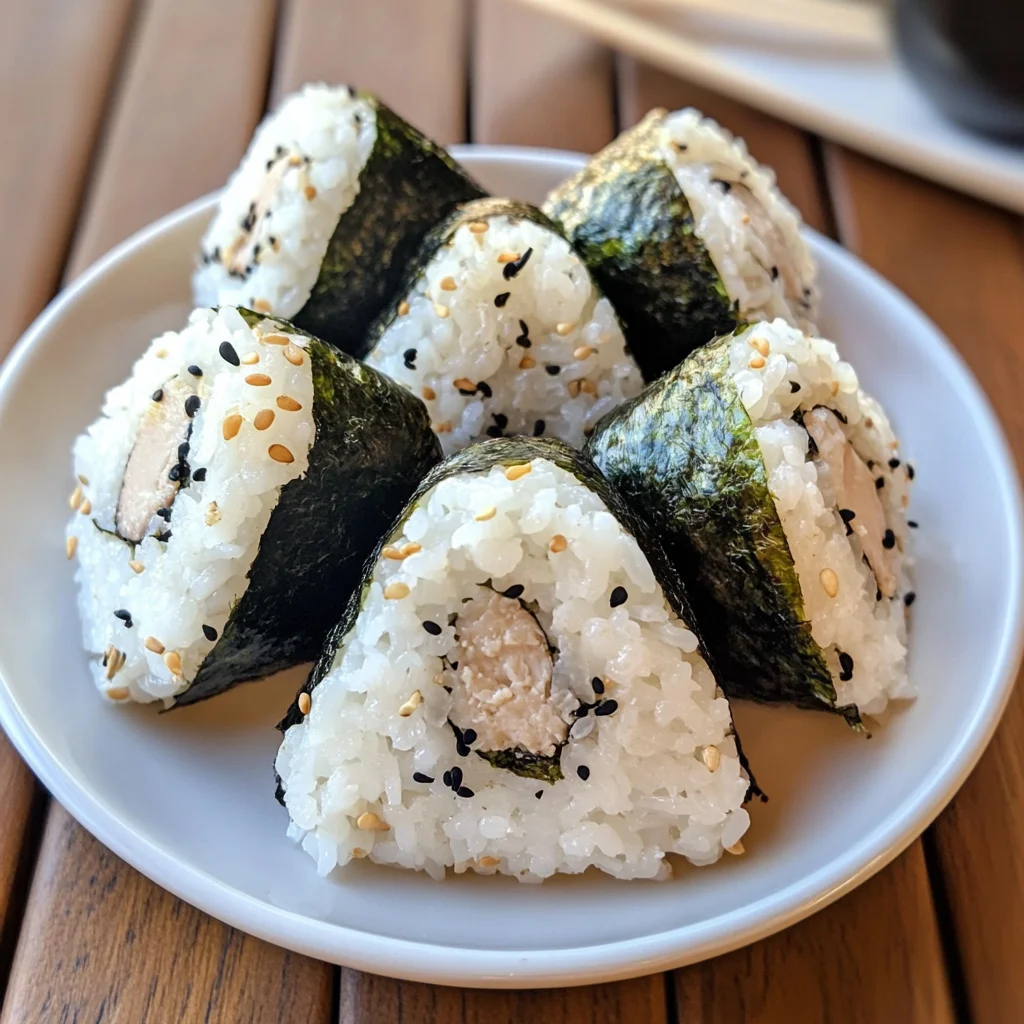
15-min. Easy Japanese Tuna Onigiri
If you’re looking for a quick and delightful treat that’s perfect for any time of day, then you need to try this 15-min. Easy Japanese Tuna Onigiri! These little rice balls are not just tasty; they’re also super easy to make with just six simple ingredients. Whether you’re rushing out the door for breakfast, packing snacks for the kids, or planning a picnic, onigiri is a fantastic choice. It’s one of those recipes that brings back fond memories of family gatherings and happy moments shared over good food.
Onigiri is versatile, too! You can customize the fillings and even the rice according to your taste. I’m excited to share this beloved recipe with you, and I hope it becomes a favorite in your home as well!
Why You’ll Love This Recipe
- Quick Preparation: With just 15 minutes from start to finish, this recipe fits perfectly into busy days.
- Family-Friendly: Kids love these fun rice balls filled with creamy tuna. They make eating enjoyable!
- Make-Ahead Convenience: Prepare them in advance for lunchboxes or snacks; they hold up well!
- Flexible Ingredients: Use whatever canned fish or veggies you have on hand—it’s all about making it your own.
- Delicious Flavor: The combination of seasoned rice and creamy tuna mayo wrapped in nori is simply irresistible!
Ingredients You’ll Need
These ingredients are simple and wholesome, making this recipe not only easy but also delicious! Here’s what you’ll need to create your very own 15-min. Easy Japanese Tuna Onigiri:
- 2 sheets nori (or use 1/2 sheet if you prefer less)
- 1 tsp sesame seeds (for garnishing, optional)
- 2 cups cooked short grain rice (*if you’re making fresh rice, see Notes below)
- 1/2 tsp salt
- 5.29 oz canned tuna (in oil recommended, or canned tuna in water)
- 2 tbsp Japanese mayo (or regular mayonnaise)
Variations
The beauty of onigiri is its flexibility! Feel free to experiment with these variation ideas:
- Swap the protein: Try using canned salmon or chicken instead of tuna for a different flavor profile.
- Add some veggies: Incorporate finely diced cucumber or avocado into the filling for extra freshness.
- Spice it up: Mix in a bit of sriracha or wasabi into the mayo for a spicy kick that will wake up your taste buds.
- Change the seasoning: Instead of salt, try using furikake—a Japanese seasoning blend—for an added layer of flavor.
How to Make 15-min. Easy Japanese Tuna Onigiri
Step 1: Prepare the Rice
Start by transferring hot cooked short-grain rice into a large bowl and seasoning it with salt using a rice paddle. Cover it and set aside. This step is crucial because warm rice holds together better when shaping the onigiri. If you’re using leftover cold rice, be sure to microwave it for 2-3 minutes first so it’s warm enough to mold easily.
Step 2: Prepare the Tuna Filling
Open your can of tuna and strain it using a fine sieve to remove excess liquids. Press down with a fork to extract as much moisture as possible. Transfer the strained tuna into a small bowl and mix in Japanese mayo until well combined. This creamy filling is what makes each bite so delicious!
Step 3: Cut the Nori
For the nori sheets, how much you use is entirely up to your preference! If you like more seaweed flavor, cut two sheets in half for four pieces. If you prefer less nori, simply use half a sheet cut into four strips. Setting this aside will make assembly easier later.
Step 4: Shape the Rice Balls
Prepare a bowl of water nearby and dip your clean hands into it—this helps prevent sticking! Take about 1/2 cup (100 grams) of cooked rice and place it in your palm. Shape it into a round ball then flatten it into a pancake about 1/2 inch thick. Make a dent in the middle and spoon in around 2 tablespoons (30 ml) of your tuna mayo mixture.
Step 5: Forming the Onigiri
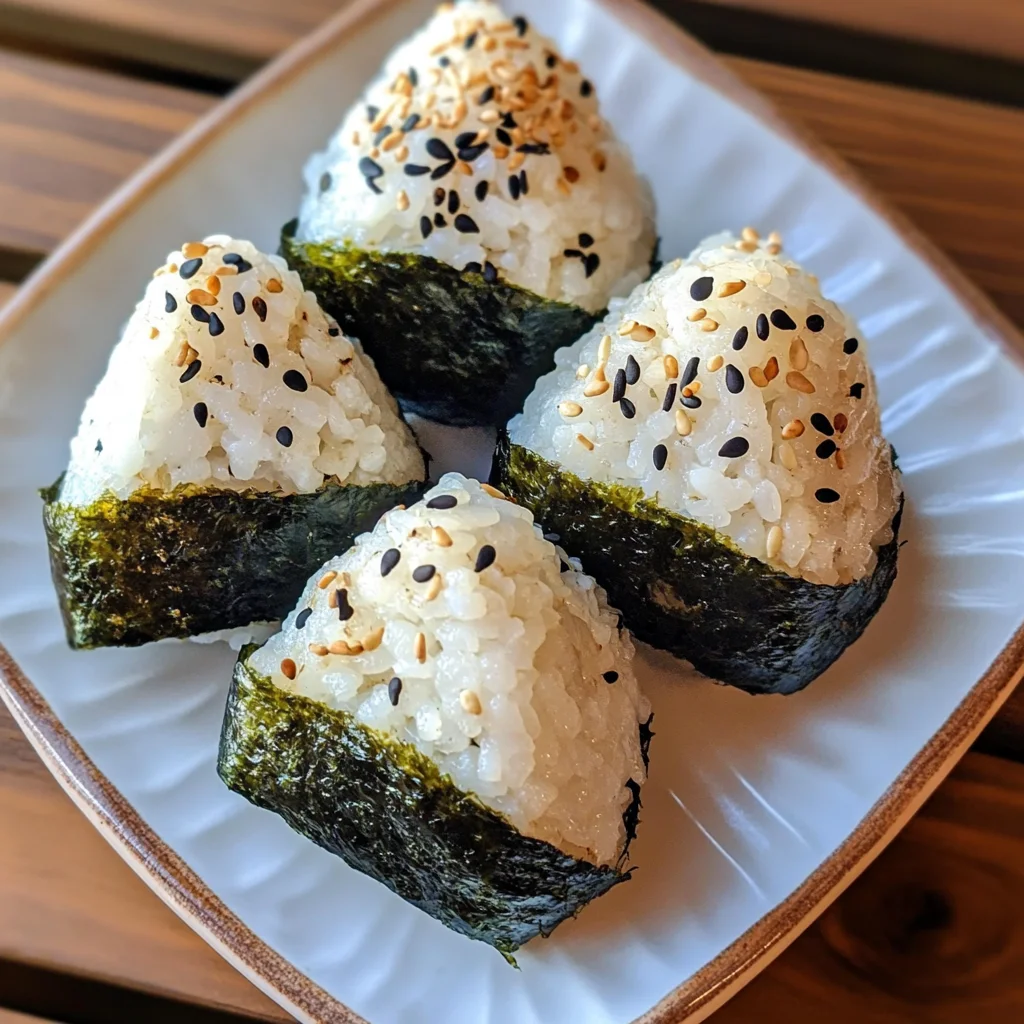
Fold the rice over the filling while pushing it gently into the center. Firmly pack everything into a ball shape, then flatten slightly so it’s about 1.5 inches thick before shaping it into a triangle—wetting your hands as needed keeps things neat!
Step 6: Wrap It Up
Finally, take one piece of nori and wrap it around the base of your triangle-shaped onigiri. Repeat until you’ve made all four rice balls! Garnish each piece with sesame seeds if desired—they add such a lovely touch! Enjoy these delights immediately; they’re best served fresh!
I hope you enjoy making these delightful little treats as much as I do! Happy cooking!
Pro Tips for Making 15-min. Easy Japanese Tuna Onigiri
Making onigiri can be a delightful experience, and with these tips, you’ll create the perfect rice balls every time!
- Use warm rice: Starting with warm rice makes it easier to mold and helps the flavors meld together beautifully.
- Wet your hands: Dipping your hands in water prevents the rice from sticking, making the shaping process smoother and more enjoyable.
- Experiment with fillings: Don’t just stick to tuna; try adding avocado or pickled vegetables to customize your onigiri for different tastes!
- Seal it well: Make sure to firmly pack the rice around the filling to prevent it from falling apart when you take a bite.
- Make ahead and store: If you’re preparing these for later, wrap each onigiri in plastic wrap and keep them in the fridge—just add nori right before serving for freshness.
How to Serve 15-min. Easy Japanese Tuna Onigiri
Presenting your onigiri in a fun way can enhance the eating experience. Here are some ideas to consider!
Garnishes
- Sesame seeds: Sprinkling sesame seeds adds a delightful crunch and nutty flavor that pairs perfectly with the tuna.
- Chopped green onions: A sprinkle of fresh green onions brings a burst of color and freshness that complements the savory filling.
Side Dishes
- Miso soup: This warm, comforting broth is a classic Japanese side that balances the flavors of tuna onigiri beautifully.
- Edamame: Lightly salted edamame pods make a nutritious snack that’s high in protein and fiber, complementing your meal perfectly.
- Pickled vegetables: A small serving of pickled radish or cucumber adds a tangy crunch that contrasts nicely with the creamy tuna filling.
- Japanese potato salad: Creamy potato salad with a hint of sweetness makes for an excellent side dish, providing a satisfying texture alongside your onigiri.
With these serving suggestions, you can enjoy your 15-min. Easy Japanese Tuna Onigiri as part of a delightful meal or snack!
Make Ahead and Storage
This 15-min. Easy Japanese Tuna Onigiri recipe is perfect for meal prep, allowing you to enjoy tasty rice balls anytime you want! You can easily make a batch in advance and store them for later use.
Storing Leftovers
- Store any leftover onigiri in an airtight container.
- Keep it in the refrigerator for up to 2 days.
- To prevent the nori from becoming soggy, wrap each rice ball in plastic wrap before placing it in the container.
Freezing
- Allow the onigiri to cool completely before freezing.
- Wrap each rice ball tightly in plastic wrap, then place them in a freezer-safe bag or container.
- They can be frozen for up to one month.
Reheating
- To reheat, remove plastic wrap and place the onigiri on a microwave-safe plate.
- Microwave for about 30 seconds to 1 minute until warmed through.
- If preferred, you can also let them thaw overnight in the fridge before reheating.
FAQs
Here are some common questions about making this delicious dish!
Can I make 15-min. Easy Japanese Tuna Onigiri with brown rice?
Yes! You can substitute short grain brown rice for a healthier option. Just make sure it’s cooked well and seasoned similarly.
How do I store my 15-min. Easy Japanese Tuna Onigiri?
Store your onigiri in an airtight container in the refrigerator for up to 2 days. If freezing, wrap them well to maintain freshness.
Can I customize the filling for this onigiri recipe?
Absolutely! Feel free to get creative with fillings like avocado, pickled vegetables, or even cooked chicken.
What is the best way to serve tuna onigiri?
Tuna onigiri is best enjoyed fresh but can also be served at room temperature. Pair it with soy sauce or wasabi for an extra kick!
Final Thoughts
I hope you enjoy making this delightful 15-min. Easy Japanese Tuna Onigiri! It’s not just a quick meal; it’s a versatile snack that brings a taste of Japan right into your kitchen. Whether you’re packing it for lunch or enjoying it as an after-school treat, I’m sure these rice balls will become a favorite. Happy cooking, and don’t forget to share your creations!
15-min. Easy Japanese Tuna Onigiri
If you’re in search of a quick and satisfying snack, look no further than 15-min. Easy Japanese Tuna Onigiri! These delightful rice balls are not only easy to prepare, but they also pack a punch in flavor. With just six simple ingredients, you can whip up a batch that’s perfect for breakfast on the go, kid-friendly lunches, or even a picnic treat. The warm, seasoned rice envelops a creamy tuna filling and is wrapped in nori, creating a deliciously portable meal. Plus, the versatility of onigiri means you can customize your fillings based on what you have at home. Whether it’s mixing in veggies or trying different proteins like chicken or salmon, this recipe is bound to become a favorite in your household!
- Prep Time: 10 minutes
- Cook Time: 5 minutes
- Total Time: 15 minutes
- Yield: Serves 4
- Category: Snack
- Method: No-Cook/Assembly
- Cuisine: Japanese
Ingredients
- 2 sheets nori
- 1 tsp sesame seeds (optional)
- 2 cups cooked short grain rice
- 1/2 tsp salt
- 5.29 oz canned tuna (in oil recommended)
- 2 tbsp mayonnaise
Instructions
- Prepare the Rice: In a large bowl, combine hot cooked short-grain rice with salt using a rice paddle. Cover and set aside.
- Make the Filling: Drain canned tuna, then mix with mayonnaise in a small bowl until well combined.
- Cut Nori: Cut nori sheets according to preference—half sheets for less flavor or full sheets for more.
- Shape the Rice Balls: Wet your hands to prevent sticking, take about 1/2 cup of rice and shape it into a ball. Create an indentation and fill it with tuna mixture.
- Form Onigiri: Fold the rice over the filling and shape into triangles.
- Wrap with Nori: Wrap each triangle with nori and garnish with sesame seeds if desired.
Nutrition
- Serving Size: 1 onigiri (100g)
- Calories: 215
- Sugar: 0g
- Sodium: 320mg
- Fat: 8g
- Saturated Fat: 1g
- Unsaturated Fat: 7g
- Trans Fat: 0g
- Carbohydrates: 30g
- Fiber: 1g
- Protein: 10g
- Cholesterol: 0mg