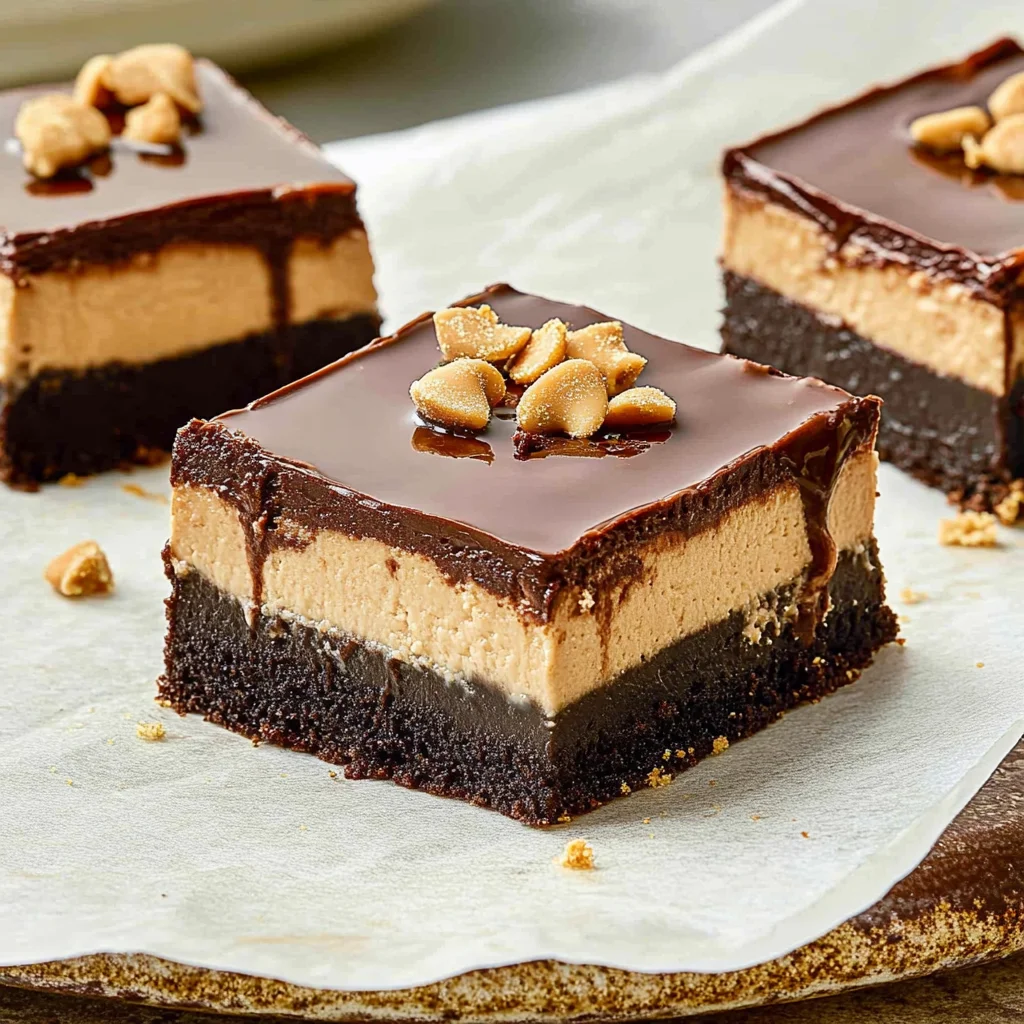
Chocolate Cheesecake Bars: Decadent Delight Awaits
Decadent Indulgence in Every Bite
I still remember the first time I made these Chocolate Cheesecake Bars; it was a rainy afternoon, and my sweet tooth was calling. Combining rich chocolate with creamy cheesecake atop a buttery graham cracker crust felt like pure magic, and the ease of preparation had me hooked from the very first bite. The texture is luxuriously smooth, while the flavors dance on your palate, making it impossible to stop at just one!
What truly makes these bars special is the intoxicating aroma that fills your kitchen as they bake, wrapping you in a warm embrace of chocolatey goodness. They’re perfect for a cozy dinner with friends or an intimate date night when you want to impress without spending hours in the kitchen. Watching loved ones savor each bite and their delighted reactions is simply priceless.
To elevate your experience, consider serving these Chocolate Cheesecake Bars alongside a dollop of freshly whipped cream or a scoop of vanilla ice cream for that extra touch of indulgence. Drizzle with a hint of chocolate sauce or sprinkle some crushed nuts on top for added flair. Trust me, once you take that first bite, you’ll be counting down the moments until you can make them again!
What are Chocolate Cheesecake Bars?
Chocolate Cheesecake Bars are a delightful dessert that combines the creamy richness of cheesecake with the indulgent flavor of chocolate, all nestled within a buttery graham cracker crust. Made with simple yet essential ingredients like graham cracker crumbs, granulated sugar, and melted unsalted butter, these bars have a perfect balance of a crispy outside and a velvety inside. Baked in the oven, they achieve an irresistible texture that’s both satisfying and rich in flavor, thanks to the softened cream cheese and melted semisweet chocolate chips in the filling. Plus, they’re incredibly easy to prepare and require minimal cleanup, making them an ideal treat for any occasion where you want something sweet without too much fuss.
Perfect For:
Date Night Delight: These Chocolate Cheesecake Bars are not only rich and indulgent but also look stunning on a dessert plate, making them the perfect sweet ending to a romantic evening at home.
Comforting Treats: On a cozy night in or a rainy day, these creamy bars provide that warm, comforting feeling we all crave, reminding you of home-baked goodness.
Crowd-Pleasing Dessert: Whether it’s a family gathering or a potluck with friends, these bars are easy to cut into squares and serve, ensuring everyone gets to enjoy their own piece of chocolate heaven.
Budget-Friendly Indulgence: With simple ingredients like cream cheese and graham crackers, you can whip up this decadent dessert without breaking the bank, delivering steakhouse flavors at home.
Chocolate Cheesecake Bars Ingredients
For the Crust
- 1 cup graham cracker crumbs – These provide a sweet, crunchy base for your rich filling.
- 1/4 cup granulated sugar – This adds sweetness to the crust, balancing the chocolate’s richness.
- 1/2 cup unsalted butter (melted) – The melted butter helps bind the crumbs together for a sturdy crust.
For the Filling
- 16 oz cream cheese (softened) – Softened cream cheese creates a smooth, creamy texture that’s essential for cheesecake bars.
- 1/2 cup granulated sugar – This sweetens the filling and enhances the overall flavor of the Chocolate Cheesecake Bars.
- 1 cup semisweet chocolate chips (melted) – Melted chocolate adds an indulgent richness and deep chocolate flavor to the filling.
- 2 large eggs – Eggs help set the filling, giving it structure while keeping it moist and creamy.
- 1 tsp vanilla extract – Vanilla enhances the flavors, adding a warm, aromatic note to every bite.
Kitchen Equipment You’ll Need

- Mixing bowl
- Electric mixer
- 9×9 inch baking pan
- Spatula
- Measuring cups and spoons
- Rubber scraper
How to Make Chocolate Cheesecake Bars
Step 1:
Preheat your oven to 350°F (175°C). While it’s heating, grab a mixing bowl and combine 1 cup of graham cracker crumbs with 1/4 cup of granulated sugar and 1/2 cup of melted unsalted butter. Make sure to mix everything together until it’s well combined and resembles wet sand. This mixture will create the perfect base for your cheesecake bars.
Step 2:
Now, take that crumb mixture and press it firmly into the bottom of a greased 9×9 inch baking pan. You want an even layer, so make sure it’s compact and covers the entire base. Once done, pop it in the oven for about 10 minutes, just until it’s set and slightly golden. After baking, remove it from the oven and let it cool while you prepare the filling.
Step 3:
In a large mixing bowl, add 16 oz of softened cream cheese along with 1/2 cup of granulated sugar. Using an electric mixer, beat them together until the mixture is smooth and creamy—this should only take a couple of minutes. The goal here is to eliminate any lumps, creating a luscious filling for your bars.
Step 4:
Next, melt 1 cup of semisweet chocolate chips in the microwave or on the stovetop. Once melted, add this chocolate along with 2 large eggs and 1 tsp of vanilla extract to your cream cheese mixture. Mix everything together until fully combined and smooth; you’ll know it’s ready when there are no streaks left.
Step 5:
Pour that delicious filling over your cooled graham cracker crust. Spread it evenly using a spatula to ensure every bite has that rich chocolate flavor. Bake in your preheated oven for about 20 minutes or until the center is set but still slightly jiggly—this will give you that perfect cheesecake texture.
Step 6:
Once baked, remove the pan from the oven and allow it to cool completely in the pan. This step is crucial as it helps firm up your cheesecake bars. Once cooled, cut into squares, and enjoy your delightful homemade chocolate cheesecake bars!
Tips
- Use fresh graham cracker crumbs: For the best flavor and texture, grind your own from whole crackers rather than using pre-packaged crumbs. This ensures a fresher taste and better binding in your crust.
- Melt the butter gently: Avoid overheating the butter in the microwave; doing so can cause it to separate. Gently melting it will keep it smooth and ensure it combines well with the dry ingredients for a cohesive crust.
- Firmly press the crust mixture: When pressing the crumb mixture into the pan, use the bottom of a flat measuring cup or your fingers to create an even layer. A well-compacted crust will hold together better once baked, ensuring clean cuts when serving.
- Let the crust cool completely: Allowing the crust to cool fully before adding the filling is crucial. If it’s still warm, it can cause the cheesecake filling to cook unevenly, affecting both texture and flavor.
- Check for doneness carefully: The bars should be set in the center but may still have a slight jiggle when you remove them from the oven. Overbaking can lead to a dry cheesecake; trust your instincts and keep an eye on them as they near the end of baking time.
- Chill before cutting: For cleaner slices, let your chocolate cheesecake bars chill in the refrigerator for at least 2 hours after cooling completely. This helps firm up the filling, making it easier to achieve perfect squares when slicing.
- Top with whipped cream or chocolate drizzle: Elevate your dessert by adding a dollop of whipped cream or a drizzle of melted chocolate on top just before serving. It enhances both presentation and flavor, providing a delightful contrast to the rich cheesecake.
Optional Ingredients
- White chocolate chips: Fold in these sweet morsels for a creamy contrast that adds a delightful sweetness to your chocolate cheesecake bars. Use about 1/2 cup for optimal flavor balance.
- Cayenne pepper: A pinch of this spice can elevate your bars with a surprising kick, enhancing the richness of the chocolate. Start with 1/8 teaspoon and adjust according to your heat preference.
- Raspberry puree: Swirl in some fresh raspberry puree to introduce a fruity brightness that beautifully complements the rich chocolate. Drizzle on top before baking for stunning visual appeal.
- Toasted pecans: Chop and sprinkle these nuts over the top for a crunchy texture and nutty flavor that pairs wonderfully with the creaminess of the cheesecake. About 1/4 cup should do the trick!
- Chocolate ganache: Drizzle this luscious glaze over the cooled bars for an extra layer of indulgence, adding both richness and a glossy finish. Simply melt equal parts heavy cream and chocolate together to create it!
What to Pair with Chocolate Cheesecake Bars?
To complement the rich and creamy texture of chocolate cheesecake bars, consider starting your meal with a fresh salad. A mixed greens salad topped with tangy goat cheese and a light balsamic vinaigrette provides a delightful contrast. The acidity of the dressing cuts through the richness of the cheesecake, while the creaminess of the cheese enhances the dessert’s luxurious feel.
Steamed or roasted vegetables also make an excellent pairing. Try serving asparagus or Brussels sprouts seasoned with lemon zest and a hint of garlic. The bright flavors and slight bitterness of these vegetables perfectly balance the sweetness of the cheesecake, creating a well-rounded dining experience that ensures each bite feels satisfying.
For a comforting side, fluffy mashed potatoes infused with sour cream can be a wonderful addition. The creamy texture mirrors that of the cheesecake bars, while a sprinkle of fresh chives offers a subtle onion flavor that elevates the dish. This pairing brings warmth to your meal, making it both hearty and indulgent, which perfectly complements the decadence of your dessert.
Finally, consider pairing your chocolate cheesecake bars with a glass of rich port or dessert wine. The sweet notes in these beverages resonate beautifully with the deep chocolate flavors in the bars, enhancing their overall richness. This pairing not only elevates the dining experience but also rounds off your meal with a touch of elegance that every dessert lover craves.
Variations and Substitutions
Almond Flour Crust: Swap out the graham cracker crumbs for almond flour to create a gluten-free option that adds a nutty flavor and a slightly denser texture. This variation not only accommodates those with gluten sensitivities but also enhances the overall richness of the bars.
Cocoa Powder Addition: For an extra chocolatey kick, mix in 1/4 cup of unsweetened cocoa powder into your graham cracker crust mixture. This will deepen the chocolate flavor and create a more complex taste profile that chocolate lovers will appreciate.
Brown Sugar Instead of Granulated Sugar: Replace granulated sugar with brown sugar for both the crust and filling. This swap adds a hint of caramel flavor and moisture, resulting in a richer, more decadent dessert that pairs beautifully with chocolate.
Peanut Butter Swirl: Incorporate 1/2 cup of creamy peanut butter into the cheesecake filling for a delightful twist. The nutty flavor complements the chocolate beautifully and creates an irresistible marbled effect when swirled through the batter before baking.
Dairy-Free Cream Cheese: For a dairy-free version, use plant-based cream cheese in place of traditional cream cheese. This substitution allows those with lactose intolerance or dairy allergies to enjoy these delicious bars without sacrificing flavor or texture.
Mint Chocolate Variation: Add 1 teaspoon of peppermint extract to the filling for a refreshing minty flavor that pairs perfectly with chocolate. This variation transforms your cheesecake bars into a festive treat ideal for any celebration or holiday gathering.
Oreo Crust: For an indulgent twist, crush Oreo cookies instead of graham crackers to form your crust. This swap infuses the bars with an extra layer of rich chocolate flavor and adds a delightful crunch that contrasts beautifully with the creamy filling.
How to Store
To keep your Chocolate Cheesecake Bars fresh, allow them to cool completely before transferring them to an airtight container. Line the container with parchment paper for easy removal, and store them in the refrigerator, where they will stay good for up to 5 days. When you’re ready to enjoy them again, simply take them out of the fridge and let them sit at room temperature for about 15-20 minutes to restore their creamy texture.
These bars can also be frozen if you want to save some for later. Slice them into individual portions and wrap each piece tightly in plastic wrap before placing them in a freezer-safe container or zip-top bag. They can be stored in the freezer for up to 2 months. To thaw, simply transfer the bars to the refrigerator overnight or leave them at room temperature for a couple of hours before enjoying; just note that freezing may alter the texture slightly, making it a bit denser upon thawing.
Frequently Asked Questions
Can I use a different type of cookie for the crust?
Yes, you can substitute graham cracker crumbs with crushed Oreos or digestive biscuits for a different flavor profile. Just keep in mind that this may change the sweetness and texture slightly, so adjust the sugar accordingly if needed.
How long should I let the crust cool before adding the filling?
It’s best to let the crust cool completely after baking for about 10-15 minutes. This ensures that the filling sets properly and doesn’t mix with the warm crust, helping to maintain distinct layers.
Can I make this recipe ahead of time?
Absolutely! You can prepare these chocolate cheesecake bars a day in advance. Just store them covered in the refrigerator after they have cooled completely, and they will taste even better after chilling overnight.
What if I don’t have unsalted butter?
If you don’t have unsalted butter on hand, you can use salted butter instead. Just reduce or omit any additional salt in your recipe to balance out the flavors.
How do I know when my cheesecake bars are done baking?
The cheesecake bars are done when the center is set but still slightly jiggly. They will firm up as they cool, so be careful not to overbake them, or they may become dry.
Can I use low-fat cream cheese for this recipe?
You can use low-fat cream cheese, but keep in mind that it may affect the richness and creaminess of the filling. For best results, stick with regular cream cheese for that classic dense texture and flavor.
Is there a way to make these bars gluten-free?
Yes, you can easily make these chocolate cheesecake bars gluten-free by using gluten-free graham cracker crumbs or a similar gluten-free cookie alternative for the crust. Just double-check that all other ingredients are also gluten-free.
Chocolate Cheesecake Bars
Ingredients
Method
- Preheat the oven to 350°F (175°C). In a mixing bowl, combine graham cracker crumbs, sugar, and melted butter. Mix until well combined.
- Press the mixture firmly into the bottom of a greased 9x9 inch baking pan. Bake for 10 minutes, then remove from the oven and let cool.
- In a large mixing bowl, beat the softened cream cheese and sugar together until smooth using an electric mixer.
- Add the melted chocolate, eggs, and vanilla extract. Mix until fully combined and smooth.
- Pour the filling over the cooled crust and spread evenly. Bake for 20 minutes or until the center is set.
- Remove from the oven and let cool completely in the pan before cutting into bars.