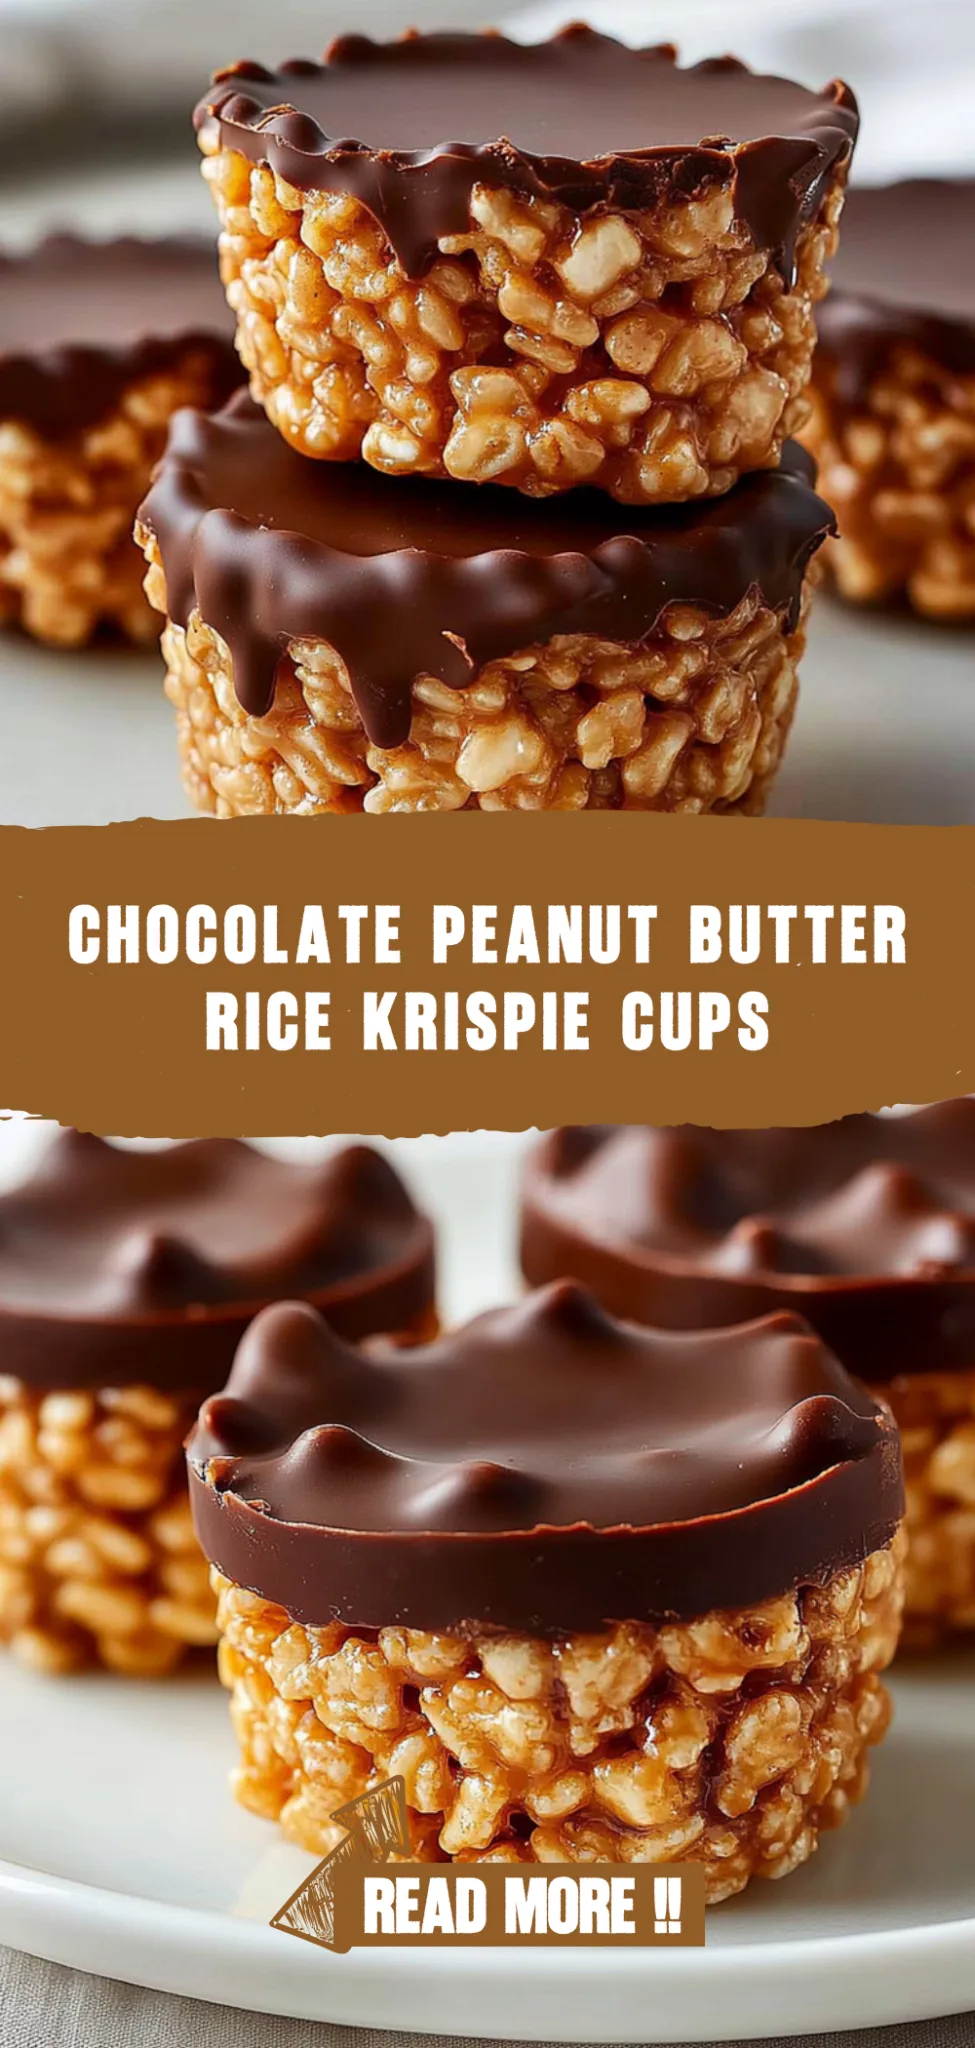
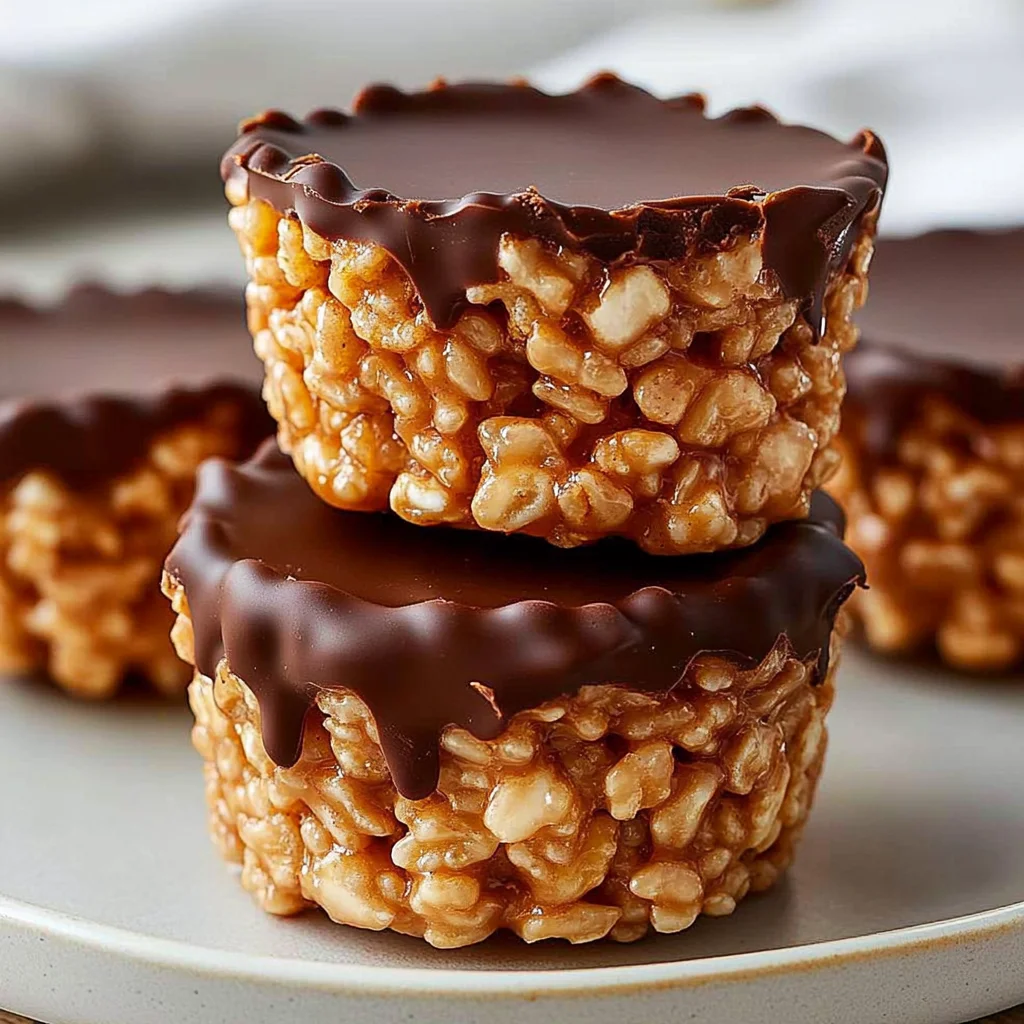
Chocolate Peanut Butter Rice Krispie Cups: Sweetly Addictive
Sweet, Crispy, and Irresistibly Fun
I remember the first time I made these Chocolate Peanut Butter Rice Krispie Cups; it was a rainy afternoon, and I was craving something sweet yet effortless. With just a handful of ingredients, these treats came together in no time, creating a delightful combination of crunchy texture and rich flavor that had me hooked from the very first bite.
What makes these little cups so special is the intoxicating aroma of melting chocolate mixed with creamy peanut butter wafting through the kitchen. The joy on my family’s faces when they took their first bite was priceless—these treats are perfect for cozy movie nights or as a quick pick-me-up during a busy weekday. They truly bring everyone together in the best way possible.
To enjoy these delectable cups to the fullest, I love serving them alongside a scoop of vanilla ice cream or drizzling them with extra melted chocolate for an indulgent touch. So gather your loved ones and get ready to whip up these Chocolate Peanut Butter Rice Krispie Cups; they’re bound to become a cherished favorite in your home!
What are Chocolate Peanut Butter Rice Krispie Cups?
Chocolate Peanut Butter Rice Krispie Cups are delightful no-bake treats that effortlessly blend the rich flavors of chocolate and peanut butter with the satisfying crunch of crispy rice cereal. These sweet bites feature a base made from 3 cups of Rice Krispies, 1 cup of mini marshmallows, and a tablespoon of butter, creating a chewy yet crispy texture that melts in your mouth. The addition of semi-sweet chocolate chips and creamy or crunchy peanut butter elevates the flavor profile, while a drizzle of extra chocolate and peanut butter on top adds a finishing touch that’s both delicious and visually appealing. Best of all, this recipe requires minimal cleanup and effort, making it an ideal choice for a quick dessert or snack that’s sure to please any crowd.
Perfect For:
Quick Treats: These Chocolate Peanut Butter Rice Krispie Cups come together in no time, making them perfect for last-minute dessert cravings or surprise guests.
Budget-Friendly Indulgence: With just a few simple ingredients, you can whip up these delightful treats without breaking the bank, satisfying your sweet tooth affordably.
Family Fun: Get the kids involved in making these easy no-bake cups—it’s a great way to spend quality time together while creating delicious memories.
Celebration Snacks: Whether it’s a birthday party or a casual gathering, these charming cups are sure to impress and delight guests of all ages with their irresistible chocolate-peanut butter combo.
Chocolate Peanut Butter Rice Krispie Cups Ingredients
For the Cereal Base
- 3 cups Rice Krispies – This crunchy cereal provides the perfect base for your treats.
- 1 cup mini marshmallows – These add a delightful chewiness and sweetness to every bite.
- 1 tablespoon butter – A little butter helps to bind everything together while adding richness.
For the Chocolate Peanut Butter Mixture
- 1 cup chocolate chips (semi-sweet) – Semi-sweet chips melt beautifully, creating a luscious chocolate layer.
- 1/2 cup peanut butter (creamy or crunchy) – Choose creamy for smoothness or crunchy for texture, both pair wonderfully with chocolate.
For the Toppings
- 1/4 cup chocolate chips (for drizzling) – Use these for a decorative drizzle that enhances flavor and presentation.
- 2 tablespoons peanut butter (for drizzling) – Drizzle this on top for an extra layer of nutty goodness in your Chocolate Peanut Butter Rice Krispie Cups.
Kitchen Equipment You’ll Need
- Mixing bowl
- Microwave-safe bowl
- Muffin tin
- Cupcake liners
- Rubber spatula
- Small bowl
How to Make Chocolate Peanut Butter Rice Krispie Cups
Step 1:
In a mixing bowl, combine the butter and mini marshmallows. Melt them in the microwave for about 1-2 minutes, stirring halfway through to ensure everything blends smoothly. You’re looking for a creamy consistency without any lumps — it should be nice and gooey!
Step 2:
Once your butter and marshmallow mixture is smooth, add the Rice Krispies. Stir gently but thoroughly until all the cereal is evenly coated with that delicious marshmallow goodness. This step is crucial for ensuring every bite has that delightful flavor you crave.
Step 3:
Spoon the Rice Krispie mixture into cupcake liners placed in a muffin tin. Press down firmly to form cups that hold their shape. Don’t worry about making them perfect; just ensure they’re compact enough to hold together when you’re ready to fill them.
Step 4:
Now, let’s move on to the chocolate peanut butter mixture! In a microwave-safe bowl, combine the chocolate chips and peanut butter. This indulgent duo is what will take your treats to the next level.
Step 5:
Microwave the chocolate and peanut butter in 30-second intervals, stirring well in between each interval. Continue this until the mixture is fully melted and smooth — it should be glossy and easily pourable, which usually takes about 1-2 minutes total depending on your microwave.
Step 6:
Pour the melted chocolate peanut butter mixture over your prepared cereal cups. Make sure to spread it evenly so every bite has that rich flavor combination of chocolate and peanut butter. It should flow beautifully over the tops of your cups!
Step 7:
In a small bowl, melt the additional chocolate chips and peanut butter for drizzling. This will add an extra touch of sweetness and visual appeal. Microwave these together in short bursts, stirring until you achieve a smooth consistency.
Step 8:
Once melted, drizzle the chocolate-peanut butter mixture over each cup generously. Get creative with your drizzling technique for an eye-catching finish; it’s all about that presentation!
Step 9:
Finally, refrigerate your cups for at least 1 hour to set before serving. This chilling time allows them to firm up nicely, so they hold their shape when you bite into them. You’ll love how they transform into delightful little treats!
Tips
- Use fresh marshmallows: Older marshmallows can become hard and lose their gooey texture, making it difficult to achieve the perfect sticky base for your Rice Krispie cups.
- Press firmly into the liners: When shaping the cereal mixture into cupcake liners, press down firmly to create a sturdy cup. This helps ensure they hold their shape once set, making them easier to remove and enjoy.
- Melt chocolate at lower power settings: When melting chocolate chips in the microwave, use medium power instead of high. This prevents scorching and ensures a smooth, creamy consistency for your peanut butter mixture.
- Opt for creamy peanut butter for smoother drizzle: While both creamy and crunchy peanut butter work well, using creamy will give you a more uniform and easy-to-drizzle topping, enhancing the visual appeal of your treats.
- Don’t skip chilling time: Allowing your cups to chill in the refrigerator for at least 1 hour helps them set properly. This is crucial for achieving a nice firmness that holds up when bitten into.
- Experiment with toppings: Feel free to mix in crushed nuts or sprinkles with your drizzle for added texture and color. This not only enhances flavor but also makes your treats festive and fun!
Optional Ingredients
- Sea salt: A sprinkle of flaky sea salt enhances the sweetness of the chocolate and peanut butter, adding a delightful contrast. Just add a pinch on top before serving to elevate the flavor.
- Cayenne pepper: For those who love a bit of heat, adding a dash of cayenne can give your treats an unexpected spicy kick. Mix it into the chocolate-peanut butter mixture for a surprising flavor twist.
- Chopped dried fruit (like cranberries or apricots): These add a chewy texture and a burst of natural sweetness that complements the rich chocolate and peanut butter. Fold them in with the Rice Krispies for added interest.
- Orange zest: A touch of orange zest brings a lively citrus brightness that cuts through the richness, making each bite refreshing. Just grate some over the finished cups for an aromatic finish.
- Toasted coconut flakes: Adding toasted coconut gives these treats a tropical flair and delightful crunch. Sprinkle them on top after drizzling with chocolate and peanut butter for visual appeal and texture.
What to Pair with Chocolate Peanut Butter Rice Krispie Cups?
To complement the sweet and nutty flavors of Chocolate Peanut Butter Rice Krispie Cups, consider serving a fresh arugula salad dressed with a tangy lemon vinaigrette. The peppery notes of arugula will provide a delightful contrast to the rich chocolate and peanut butter, while the acidity of the vinaigrette will help cut through the sweetness of the treats. Adding in some sliced strawberries or apples can introduce a refreshing burst of flavor that balances the creaminess of your dessert.
Another great option is to pair your treats with roasted Brussels sprouts or honey-glazed carrots. The earthy, slightly bitter taste of roasted Brussels sprouts will provide a pleasing textural contrast to the chewy marshmallows and crunchy rice cereal, while honey-glazed carrots add a subtle sweetness that complements the dessert without overpowering it. This balance between savory and sweet enhances the overall enjoyment of both dishes.
For a comforting side, consider serving buttery cornbread alongside your rice Krispie cups. The moist, slightly sweet cornbread offers a wonderful texture that pairs beautifully with the crispy yet chewy treats. Additionally, the warmth and heartiness of cornbread create a sense of comfort that rounds out your meal perfectly, making it feel complete and satisfying.
Finally, for beverages, a glass of cold milk or even a creamy vanilla milkshake makes an ideal pairing. Milk’s classic taste not only enhances the chocolate and peanut butter flavors but also softens their richness, making each bite more enjoyable. If you’re feeling adventurous, you could even whip up an iced mocha or coffee float for an adult twist that harmonizes well with your dessert’s profile.
Variations and Substitutions
Gluten-Free Cereal: Substitute Rice Krispies with a gluten-free cereal option, such as brown rice cereal or gluten-free crisped rice. This maintains the delightful crunch while ensuring that those with gluten sensitivities can enjoy these treats without worry.
Nut Butter Swap: Replace peanut butter with almond butter, cashew butter, or sunflower seed butter for a different flavor profile. Each nut or seed butter brings its own unique taste and creaminess, allowing you to customize the richness of your Chocolate Peanut Butter Rice Krispie Cups.
Coconut Flakes Addition: Mix in 1/2 cup of sweetened coconut flakes into the cereal base for a tropical twist. The coconut adds a chewy texture and enhances the flavor profile, creating a delightful contrast to the chocolate and peanut butter.
Dairy-Free Chocolate Chips: Use dairy-free chocolate chips instead of semi-sweet chocolate chips to make this recipe vegan-friendly. The rich taste of dairy-free options ensures everyone can indulge in these delicious cups while accommodating dietary restrictions.
Caramel Drizzle: Instead of chocolate drizzle, use melted caramel for a rich and gooey topping. This sweet addition offers a contrasting flavor that beautifully complements the peanut butter while adding an extra layer of decadence.
Spicy Kick: Add a pinch of cayenne pepper or chili powder to the chocolate peanut butter mixture for an unexpected spicy twist. This subtle heat pairs surprisingly well with the sweetness, creating a complex flavor experience that will intrigue adventurous eaters.
Crunchy Topping Variation: Top your cups with crushed pretzels or chopped nuts for an added crunch. This not only enhances the texture but also introduces a salty element that balances out the sweetness beautifully.
To store your Chocolate Peanut Butter Rice Krispie Cups, allow them to cool completely at room temperature before transferring them to an airtight container. They can be kept in the refrigerator for up to one week. If you need to reheat them, briefly microwave on low power for about 10-15 seconds; this will help restore some of their original softness without melting the chocolate too much.
These treats do freeze well, but note that the texture may change slightly upon thawing. To freeze, individually wrap each cup in plastic wrap and place them in a freezer-safe container or zip-top bag, ensuring to remove as much air as possible. They can be stored frozen for up to three months; when ready to enjoy, simply thaw them in the refrigerator overnight and allow them to come to room temperature before serving for the best texture.
FAQ
Can I use a different type of cereal instead of Rice Krispies?
Yes, you can substitute Rice Krispies with other puffed cereals like Corn Pops or even granola for a different flavor and texture. Just make sure the cereal is crispy to maintain the structure of the cups.
What should I do if I don’t have mini marshmallows?
If you don’t have mini marshmallows, you can use regular-sized marshmallows instead. Simply cut them into smaller pieces to achieve a similar effect when melting with the butter.
Can I use natural peanut butter in this recipe?
Absolutely! Natural peanut butter works well, but keep in mind that it may be a bit runnier than standard creamy peanut butter. If using natural peanut butter, give it a good stir before measuring to ensure an even consistency.
How long can I store these Chocolate Peanut Butter Rice Krispie Cups?
You can store these cups in an airtight container in the refrigerator for up to one week. Just make sure they are fully set before storing to prevent them from sticking together.
Can I freeze the Rice Krispie Cups for later?
Yes, these treats can be frozen! Place them in an airtight container separated by parchment paper and freeze for up to three months. Let them thaw in the fridge before enjoying.
Is there a way to make this recipe vegan-friendly?
To make these cups vegan, use dairy-free chocolate chips and a plant-based butter alternative. Additionally, ensure your peanut butter is free from any animal products. This will create a delicious vegan version without compromising flavor!
Chocolate Peanut Butter Rice Krispie Cups
Ingredients
Method
- In a mixing bowl, melt the butter and mini marshmallows in the microwave for about 1-2 minutes until smooth, stirring halfway through.
- Add the Rice Krispies to the melted mixture and stir until evenly coated.
- Spoon the mixture into cupcake liners placed in a muffin tin, pressing down to form cups.
- In a microwave-safe bowl, combine the chocolate chips and peanut butter.
- Microwave in 30-second intervals, stirring in between, until fully melted and smooth.
- Pour the chocolate peanut butter mixture over the cereal cups, spreading it evenly.
- In a small bowl, melt the additional chocolate chips and peanut butter for drizzling.
- Drizzle the melted mixture over the chocolate peanut butter layer.
- Refrigerate the cups for at least 1 hour to set before serving.